The Dos And Don'ts Of Finding The Right Lighting For Makeup Application
You just watched the latest TikTok makeup hack that will help you select the perfect lip color, and it seemed relatively easy to follow. After gathering all your supplies and heading to your bathroom, your application under the lights of your vanity looked perfect. But the second you caught your reflection in the window, you realized your makeup didn't look as flawless as you thought.
Provided you followed the instructions perfectly it's likely that your vanity lighting isn't optimal. There's a reason that makeup artists drop a small fortune on lighting in their studios and on supplies to carry with them. Getting flawless makeup application requires white, soft lights that are as close to daylight as possible and therefore show the true color of your skin.
Not only do you need to pay attention to the color of your lights, but the wattage, heat output, and placement can take your makeup from novice to expert level too. Ensure your next beauty hack looks flawless by figuring out the ideal bathroom lighting before taking out your makeup bag. You'll also learn why placement for your lighting is so important.
Use natural light when you can
There is a reason that makeup application in your car, while not optimal, always looks fantastic: It's the natural light. When applying makeup, natural light is the best possible lighting choice. Sunlight provides a soft, white light perfect for blending because it removes shadows. Since your car has no place to set up your makeup table, choose a room with a window. It's essential to make sure you're facing the natural light.
If the light is coming from behind, you'll get strange shadows that can lead to a foundation mismatch or too-heavy coverage. As makeup expert Melanie Barrese told Illamasqua-US, "Lighting is everything when it comes to makeup, and that's whether you're doing makeup on a shoot or in your bathroom. More than anything, you need to ensure the lighting [is] a slightly warm, white light." She continued, "But more importantly, it's directed at your face, as opposed to overhead, this will allow you to clearly see your face."
Nothing is more annoying than leaving your bathroom looking perfect only to give yourself a quick look in your car's vanity mirror to find that the coloring is wonky. Daylight is the clear winner for makeup application in every category; however, it's not always available when preparing for a night out with your significant other. Additionally, not every bathroom or room in your house will have the perfect window placement. In that case, it's time to look at different artificial light types to give you that ideal illumination.
Stock your vanity with daylight-mimicking LED lights
It'd be great if you could just harness sunlight whenever you needed it, but obviously, that's not an option. So, when you're getting ready at night or on a cloudy day, it's essential to have a viable alternative to light up your face to ensure you don't get heavy-handed. When looking for the best way to light up your bathroom, consider the heat and color of the light first. Steer clear of bulbs that crank out enough heat to make your makeup sweat off as you apply it.
Instead, opt for something that will mimic the feel of sunlight to give you the best color-matching possible. When you consider these two factors, LED lighting is your go-to. Wanchen Kaiser, co-founder and CMO of Glamcor and Riki Loves Riki, explained to Byrdie, "LED lights are more efficient due to less heat, more light, and better quality." The type of light you use is vital but getting the correct wattage is just as important.
For soft lighting, stick with 40W. Having a dimmer on your lights can be a lifesaver to give you just the right amount of brightness for a light application or more if you're doing a full face. If LEDs aren't available during your next shopping adventure, try looking for incandescent bulbs (just remember they emit more heat). Equally important as buying the right lights is setting them up to give your face all-over coverage and eliminate shadows.
Position the lights to properly illuminate your face

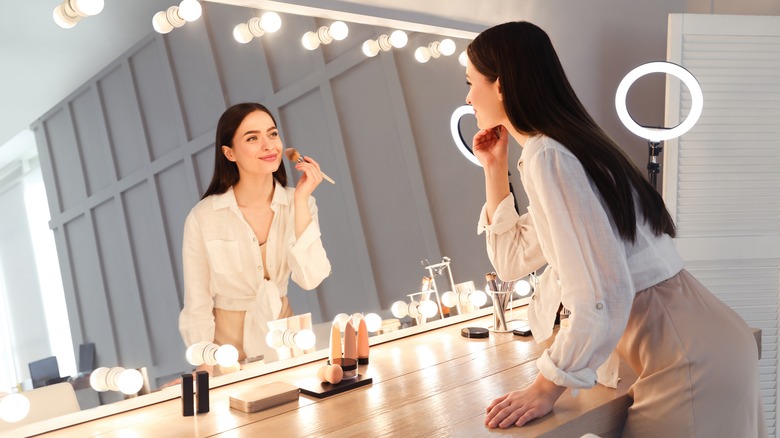
You've got all the lights your makeup table could hope for to illuminate your skin with a natural glow. Now, it's time to think about the position of those lights for flawless makeup application. The key to lighting is ensuring every part of your face is illuminated equally. Shadows are the enemy so consider investing in continuous LED lights that you can use to light your face from the top and sides to give your sun-kissed skin the perfect glow.
You could also try a ring light that provides an even halo of light, tackling sneaky shadows with a 1-2 punch. For example, buy an LED ring light mirror combo used exclusively for makeup. Kaiser recommended to Byrdie, "Find a mirror that will mimic daylight color lighting, is high-definition (that provides the best clarity), and is easy to travel with."
If new side lights aren't readily available for your overhead lighting situation, reflectors on the sides of your mirror can also come in handy. Buy small photography reflectors or create them with some cardboard and aluminum foil. Play with the positioning until all shadows are extinguished. Perfect lighting and positioning are vital to smooth and even makeup application, so it's essential to know what to avoid in makeup lighting too.
Always avoid colored lights when applying makeup

Makeup mistakes can have more to do with lousy lighting than you think. With the wrong lighting, you may use more makeup than you need because of shadows, add the wrong colors, and even blend unevenly. Since fixing your makeup in the car on the way to work is time-consuming and potentially dangerous, learning the don'ts of makeup lighting can keep your skin looking fresh and dewy.
One of the biggest lighting faux pas you can make is using fluorescent lighting to apply your makeup. Due to the brightness of the blinding lights and the heat, you'll apply too much foundation and bronzer, then sweat it off instantly. You might have looked like hot stuff in your mirror, but you'll definitely look like a hot mess when you step outside.
Avoid beauty blunders by sticking to white light rather than yellow, orange, or rose light, because these lead to applying products that are either too light or heavy. Sure, putting your makeup on using your bedside lamp might be easy, but it doesn't look right when you walk out the door. Equally important as choosing the right lighting is lighting positioning. Certain lighting positions can create drastic shadows that are difficult to work with.
Lighting positions to avoid like the plague
You've spent a lot of time getting the perfect-colored lights. But all that work and money can easily be wasted by having your lights in the wrong position. Two of the worst positions for lights are overhead and underneath, without any side light action. With them positioned only above your head, drastic shadows are created under your nose, eyes, and chin. So, you come out with cakey concealer under your eyes and not enough coverage under your chin.
On the flip side, if lights are coming at you from below, your forehead definitely isn't going to match your chin. Think about holding a flashlight under your chin to scare your friends when you were younger. Is that really the type of lighting you want to use to apply your makeup? The result could be equally as scary.
There is more to getting the perfect foundation coverage than just your application technique. Your lighting needs to be on point too. Try to use natural light when it's available, or stick to soft LED lights that illuminate your face from the sides or in a circle. Steer clear of colored or bright lights and overhead lighting to avoid a makeup hot mess.