How To Recreate The Invisible French Manicure Look At Home

Nail art has been all the rage recently on social media, giving life to trends such as checkered polish and watercolor nail art. Nail artists aren't just creating new looks but also putting modern twists on classic ones. French manicures in particular have exploded in popularity in recent years, giving way to some innovative new takes on the elegant look.
The invisible French tip, also known as the outline French, is one take on the classic nail look that you can even attempt at home. This nail art is closely related to the trendy double-tip manicure, which can be executed in different ways but always includes two "tips" instead of the classic one.
The invisible rendition of the look uses nail polish to outline the French tip area of the nail but leaves the bulk of the space neutrally colored, creating an outlined or invisible look. This can look similar to the double-tip style in that it appears to have two distinctly drawn tips. However, the negative space essential to this look isn't always present in the double French manicure.
If you like to DIY your nail looks, then this is definitely one you can try to achieve on your own. Read on to find out how the recreate the outline French manicure at home.
Breaking down the basics for the invisible French manicure
To recreate the invisible French tip manicure look, you first need to gather your supplies. We recommend beginning by prepping as you would any other manicure, which includes cleaning, shaping, buffing, and moisturizing your nails.
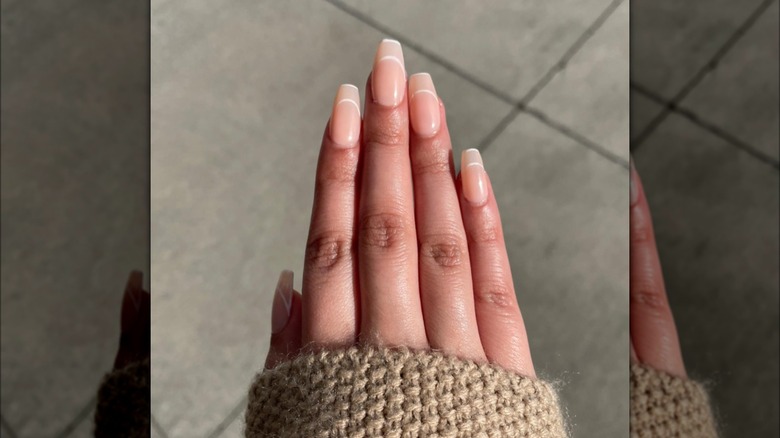
To get started, you'll need a base coat color, an outline polish, a clear top coat, and a long, thin striping brush. For a base coat color, a nude or light pink is the traditional option for a French manicure. As seen in the example from Instagram user @trevi.studios, using white polish for the tip outline echoes the classic French look, but you can customize your own nails by choosing any color you want.
You might also consider using false nails for length and gel nail polish to help edit your mistakes. Remember to cure your nails in between coats if you're using gel polish. This will especially help when it comes to drawing your outline.
Achieving the outline French tip look at home

Once you've decided on your colors and gathered your supplies, you can start with the actual process of recreating the invisible French manicure. After prepping your nails, apply your nude base coat. For a truly "invisible" style, stick to applying one layer of this color to create a translucent look.
If you're using gel nail polish, make sure you cure this first layer before moving on to the tips. For the outline, LOOKFANTASTIC explains in a YouTube video that you should place your nail polish on a wipable surface such as a plate or sheet of tin foil so that it's easier for your striping brush to pick up.
To draw the French tip outline, take your striping brush and trace the open edge of your nail, drawing the polish down the side. Typically, the line becomes thinner as you trace down the side of your nail, but you can choose to make the outline as thick or thin as you want. Then, you can move further down the nail and draw the outline's underside, connecting the original line's two sides in a smile-like shape.
This process will likely take some trial and error, which is why gel polish is so useful: It helps you easily wipe away the outline polish if necessary. Once you've gotten your invisible tips in the shape that you want, cure the polish and move on to the top coat. Then, you've finally achieved the invisible French manicure!