6 Yoga Poses To Ease Back Pain
 Shutterstock
If you've ever gone to battle with back pain, you know it can knock you out and sideline you from life until the pain subsides. Back pain is no joke, and even if you're one of the lucky few who has skated through life without so much as a twinge, your time may be a comin'. According to the American Chiropractic Association, it's estimated that 80 percent of the adult population will deal with back pain at some point in their lives. So, yay! Get ready for that.
I, for one, am no stranger to the pain. After getting in a car wreck at 21, I've been plagued with chronic low back pain that ebbs and flows with time, but never completely subsides. The only good thing to come from my distress is that I've tried just about every trick in the book to handle the pain, and while I have a slew of go-to remedies that can help in a pinch, the best solution I've found is to maintain a regular yoga practice.
Katie Brauer, a TedX speaker and Master Yogi explains, "Yoga postures that stretch the hamstrings, quads, hip flexors, outer hips and quadratus lumborum (the low back muscles), can be incredibly beneficial to easing back pain." And while a full-length class that takes you through a steady flow of poses to loosen up your entire body is certainly worth doing, sometimes you just need a few go-to moves to help ease the pain. Brauer offers the following six poses as your well-rounded remedy along with the following advice, "Remember to breathe deeply and focus on relaxing in the places you feel the most sensation. I recommend you stay in these postures for at least 10 to 15 breaths."
Pyramid Pose
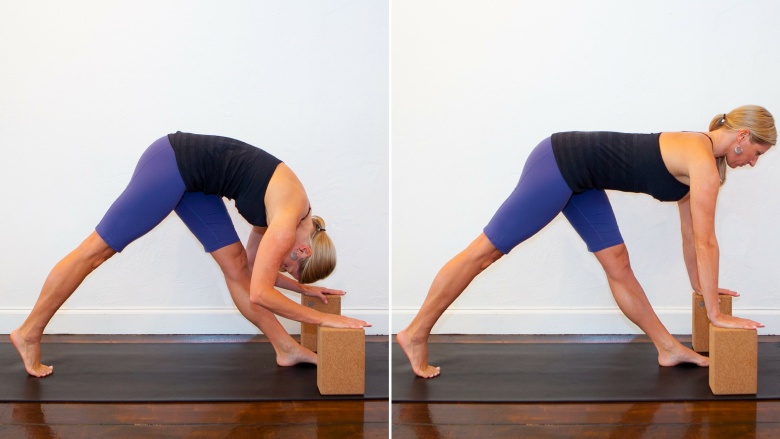
According to Brauer, the pyramid pose targets your central and lateral hamstrings – areas many people find particularly tight. Yoga blocks can help you enter the pyramid pose without placing too much strain on your low back. If you don't have access to yoga blocks, grab a few sturdy books to use in their place. To perform the pose, follow the steps laid out by Brauer:
- Standing tall, begin with your feet together, hips square to the front of the room.
- Step one foot back about two to three feet. The heel of your back foot doesn't need to touch the ground.
- Fold forward from the hip to enter the standing forward fold. Use the blocks or books to help you comfortably perform this movement.
- Inhale and elongate the spine to the horizon, so your torso is parallel to the floor.
- Exhale and, leading with the chest, hinge at the hips and bow over your front leg.
- Breathe fully and deeply into the sensation in the backs of your legs. Lengthen the spine on your inhalations (repeating step four), and deepen the pose on your exhalation (repeating step five).
Down Dog
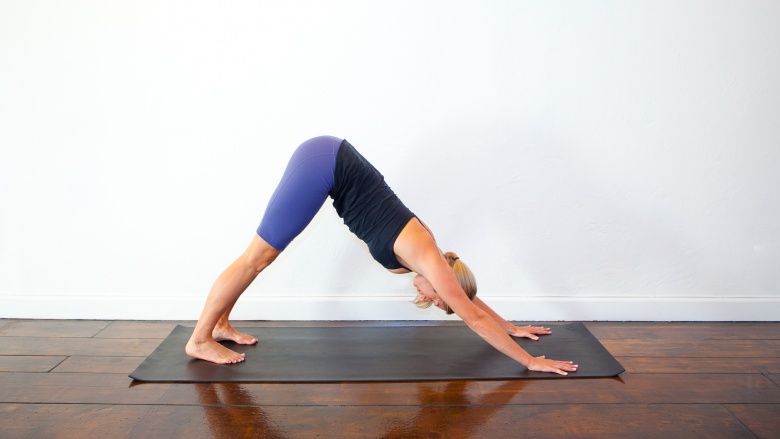
Most people are familiar with the down dog pose, and it's a great one for low back pain because, according to Brauer, it helps loosen the hamstrings while simultaneously decompressing the spine and strengthening the shoulders. Even if you've done down dogs a million times, check your form to make sure you're doing the exercise correctly.
- Start in a table top position on all fours with your knees beneath your hips, your palms beneath your shoulders.
- Place your hands shoulder-width apart and tuck your toes under, gripping the mat.
- Press through your palms and your toes as you push your hips up toward the sky to form an upside down "V."
- Push into all 10 finger pads and reach your tailbone skyward. Make sure you keep a bend in your knees to ensure you have an elongated spine.
- Allow your head to hang heavily between your arms.
- Check to make sure your spine is straight. If you notice any rounding, bend your knees more and articulate your tailbone toward the ceiling to lengthen the spine.
Low Twisting Lunge
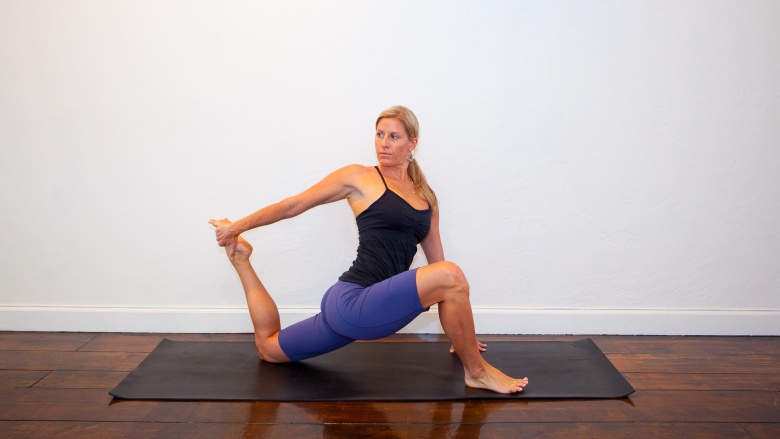
If you have a desk job and spend most of your day sitting, chances are you have incredibly tight hips. While working toward my masters degree in exercise science, one of the subjects we discussed in my coursework was the detrimental affects of the modern workplace on human anatomy. The more you sit, the more your muscles adapt and change to accommodate constant sitting... and not in a good way. Your hips, particularly your hip flexors, shorten and tighten because they're so infrequently extended, and your glutes simultaneously weaken. These adaptations, combined with the spine-compressing effects of sitting, are key contributors to low back pain. Hip-opening poses, like the low twisting lunge suggested by Brauer, are instrumental to counteracting the negative effects of constant sitting. Perform this pose as outlined by Brauer:
- Begin in a low lunge with your right foot forward, your heel planted, and your left foot backward, your left knee kneeling on the ground with your left foot extended behind.
- Slightly turn out your right toes and place your left hand on the ground below your left shoulder, "grounding" yourself through your palm.
- Bend your left knee, and reach back with your right hand to grasp your left foot.
- Press your foot into your hand and pull your hand back into your foot. These counteracting forces should take place simultaneously.
- Support the extension of your spine by drawing your navel in and up, elongating your torso.
- Take full, deep breaths.
- For more stretch, draw your heel in toward your buttocks and square your shoulders to the front of the mat while lowering your chest and keeping length in your spine.
- Perform for the full 10 to 15 breaths before repeating the pose to the opposite side.
Baby Cradle
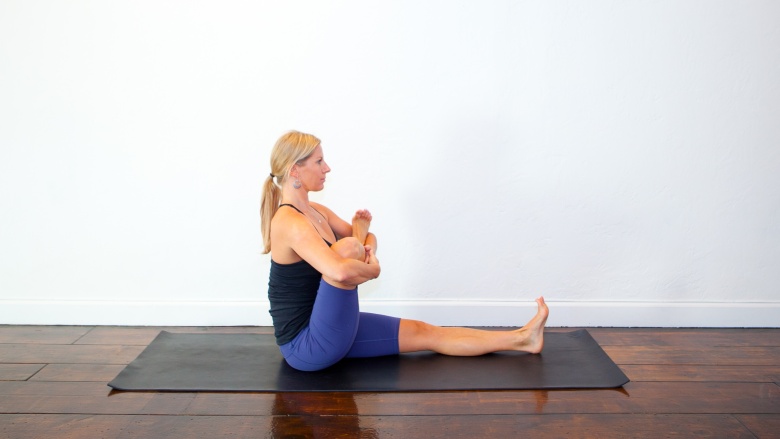
This exercise can be challenging, especially if you have very tight hips, so do what you can, never pushing yourself to the point of pain. According to Brauer, you'll target your piriformis (a deep muscle located behind the gluteus maximus), the "deep six rotators" which are a group of muscles that help laterally rotate the hip, all three major muscles of the glutes, and the quadratus lumborum, or QL, which is the deepest muscle in the abdominal cavity that connects the pelvis to the spine.
- Sit down on the ground and "ground into" your sit bones, lengthening your spine with both legs outstretched.
- Bend your right knee and bring your ankle to your left thigh, crossing your ankle over your body so your shin bone is parallel to the ground.
- Use your hands to pick your right foot up off your thigh, placing your right foot into the crook of your left elbow before wrapping your arms around your right leg to cradle your leg to your body, as if cradling a baby.
- Once situated, rise up through your spine, sitting tall, and lengthening as you gently rock your right leg.
Seated, Extended Leg Side Stretch
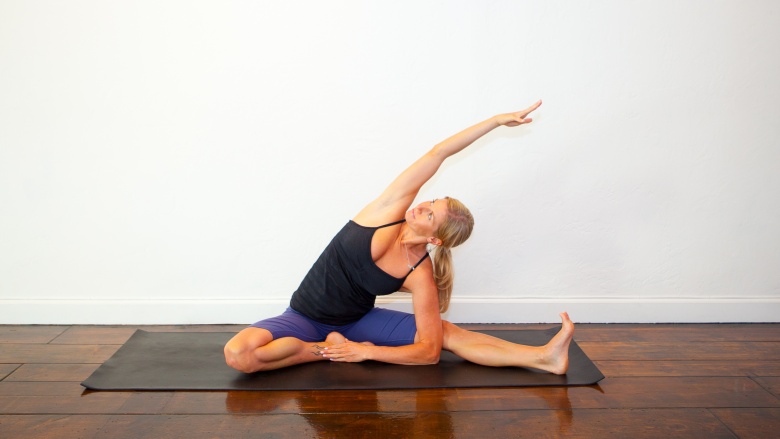
Even if you're not a big yogi, you've probably done a variation of this stretch at some point in your life, as it's a long-time favorite of elementary school PE teachers. The good news is, it's effective. As Brauer points out, it targets the medial and central hamstrings, the QL, and the entire "side body" consisting of the latisimus dorsi, obliques, transverse abdominis, and intercostals muscles. Perform the exercise as follows:
- Sit on your sit bones with your left leg extended out to the side, your right knee bent with the sole of your right foot placed to the inside of the left thigh.
- Internally "wrap through the thighs," shifting your weight slightly forward on your sit bones as you square off your legs.
- Inhale and sweep your right arm to the sky.
- Exhale and stretch up and over, toward the left side.
- Breathe fully and deeply, breathing "into" the right side body.
- Complete your 10 to 15 breaths and repeat on the opposite side.
Relaxation Pose
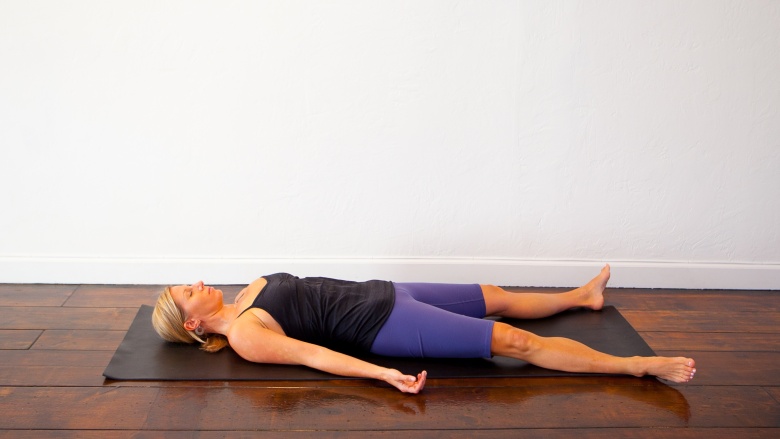
Don't ever underestimate the importance of conscious relaxation. Low back pain is often exacerbated when the muscles of the back, glutes, and hips contract and fail to release, leading to further inflammation and the potential for pinched nerves. According to Brauer, the relaxation pose, known in yoga circles as savasana, initiates a relaxation response in the nervous system that helps relax tight muscles and reduce stress.
- Lie on a mat with your legs extended, a little wider than hip-width apart.
- Extend your arms by your sides, your palms facing up.
- Close your eyes and relax your entire body, releasing it into the support of the ground beneath you.
- Allow your breath to flow in an easy rhythm without effort.
- Take at least five minutes to lie quietly, resting and relaxing.