55 Glitter Nail Designs To Add Some Everyday Sparkle To Your Look
You sparkle, shine, and pop with electricity, so it stands to reason you would want nails to match. Enter the wonderful world of glitter nail polish, and the magic it can create. From fully loaded to just a hint and simple designs to artistic creations, there's a glitter nail perfect for your special occasion or just a day at the office.
Of course, there are a few tips to help you with your glitter manicure. When dry, glitter polish has a textured finish, so you'll want to top your nails with one to two shiny top coats for a glassy finish. If your polish is chock full of glitter, according to nail artist Gina Edwards, you should apply thinner coats and let each coat dry for several minutes before applying the next; you'll avoid a gloppy, thick finish with this method (via Glamour).
And, while you'll love the look of your glitter nails, all good things must come to an end, and you'll eventually need to take the polish off. The easiest way to remove even the most stubborn shiny flakes is with the help of cotton balls and tin foil. Soak the cotton in nail polish remover, apply it to the nail, and wrap it tightly with tinfoil to keep it in place. In about five to ten minutes, you can twist off the cotton ball and foil, along with the glitter polish. Now, on to those 55 hot glitter nail designs.
Taste the glitter Skittles
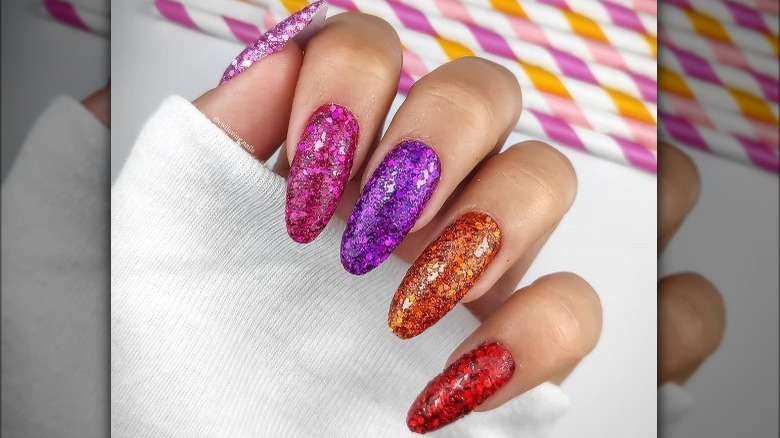
Skittle manicures have had their moment in the spotlight, and with good reason: the multiple colors are as sweet as candy. You can add a sparkly twist to the trend by making the rainbow a glitter one. Jewel tones — like amethyst, ruby, pink sapphire, and topaz — lend themselves especially well to glitter nails. For full coverage, try painting your nails with a metallic polish before applying the matching glitter polish on top.
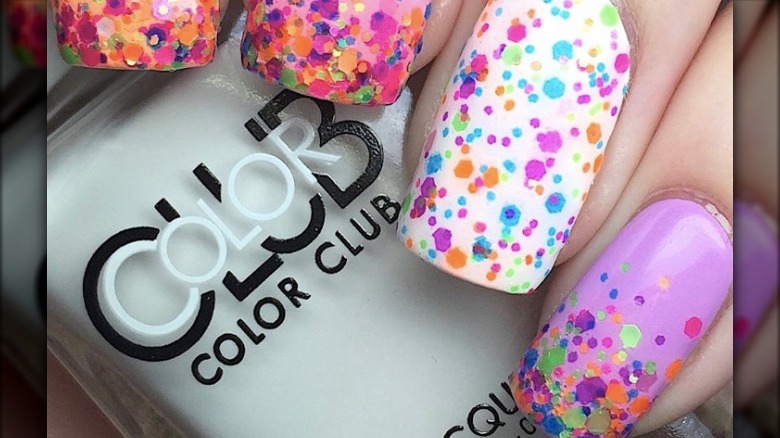
Rainbow glitter dots
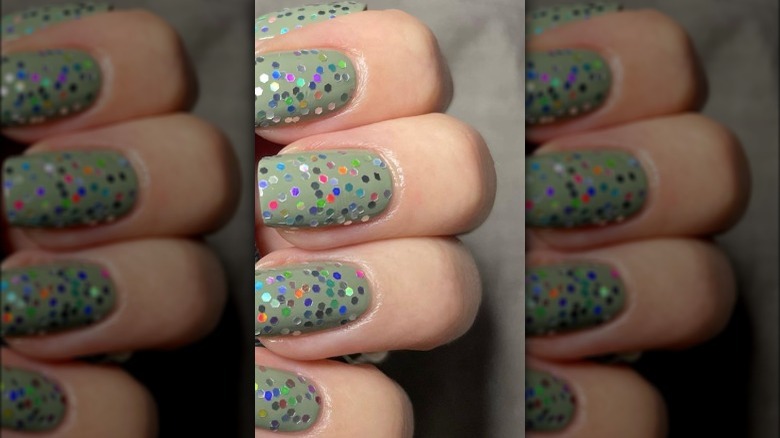
While gold and silver are staples in glitter nail polish, there's something to be said for glitter that comes in so many pretty colors. Bring a jolt of sparkly color to a solid base shade, or just layer on multi-colored glitter over a clear base coat. If you can't find a combination of glitter colors you like, feel free to layer thin coats of different glitter polishes over each other.
Bottoms up
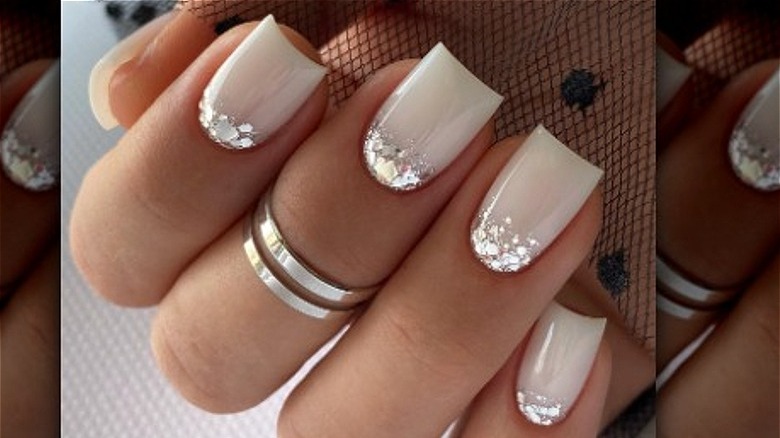
How do you up the style factor on a creamy white manicure? By adding a touch of sparkle, of course! Using silver glitter polish, dab a bit along the bottom of your nail bed, filling the curve of the cuticle. You may need to add more than one coat, depending on how full of glitter your polish is, and how much sparkle you want. It's how you make a neutral nail extra special. And this look is great for a bride.
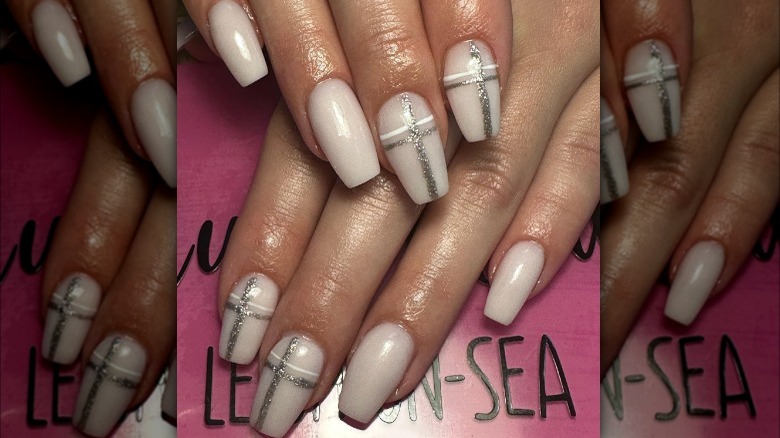
French manicures -- the sparkly way
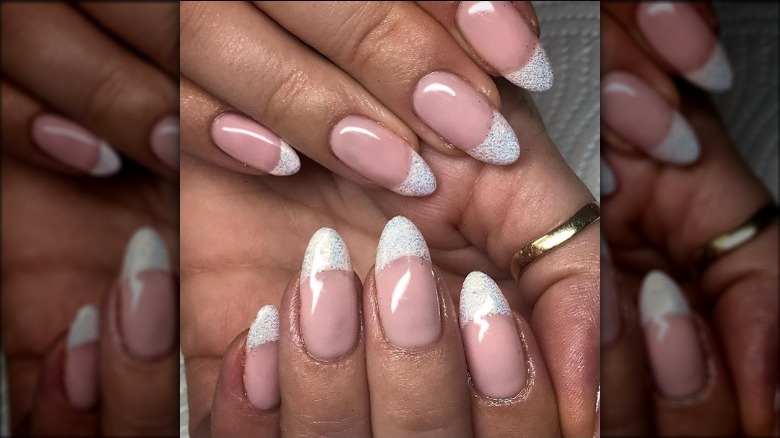
French manicures are a staple in the nail world, and for good reason: In their original form, they're the perfect neutral nail look. But they also lend themselves to creative twists, like with glitter. A traditional French manicure starts with a beige, peach, or pink base, then gets tipped with white polish. Don't be afraid to switch that classic look up. To add sparkle, make that neutral base a glitter one. Alternatively, you could opt for some glittery tips.
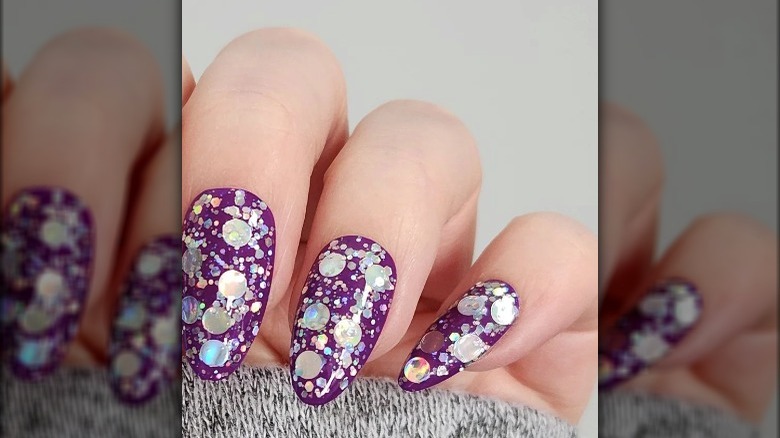
Jewelry box nails
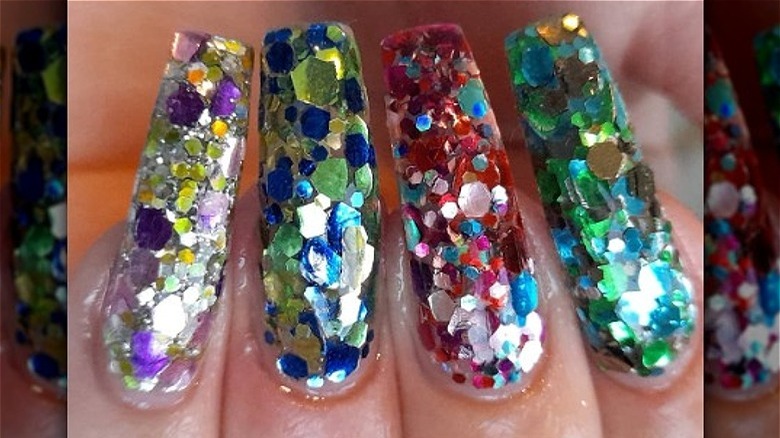
Precious gems, anyone? Your rings don't have to be the only thing that sparkle on your hand, especially with a jewelry-box manicure. Glitter nail polish helps each nail look like its own treasure chest of jewels. Combine both small and larger glitter flakes to simulate amethysts, topazes, rubies, sapphires, emeralds, aquamarines, and silvery diamonds. You could paint each nail to match, or you could choose to have all the gems all at once for a spectacular finish.
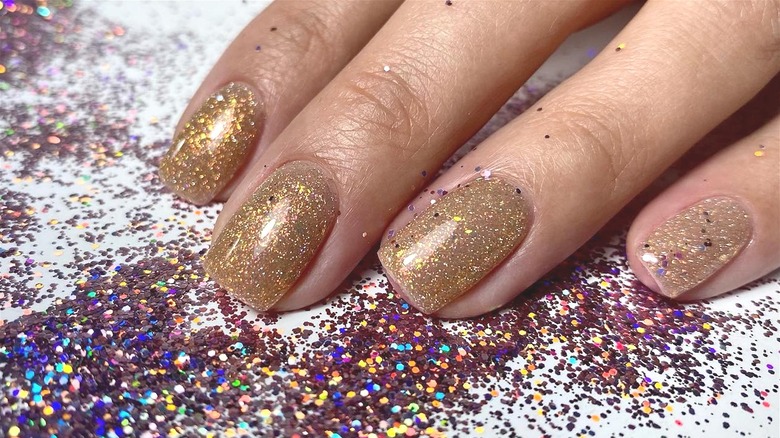
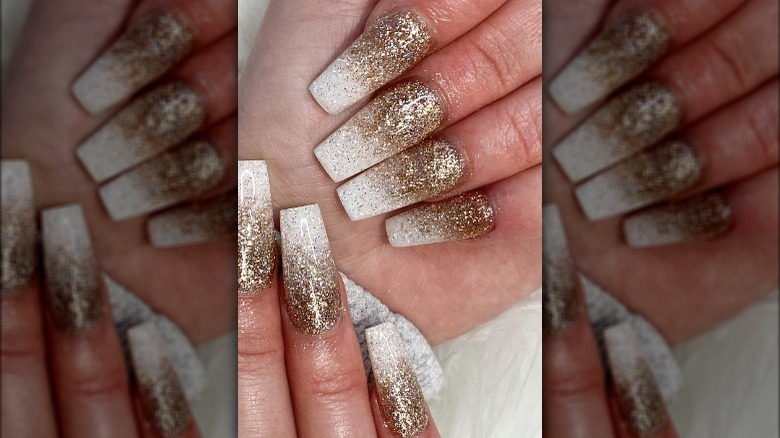
Fade into glitter
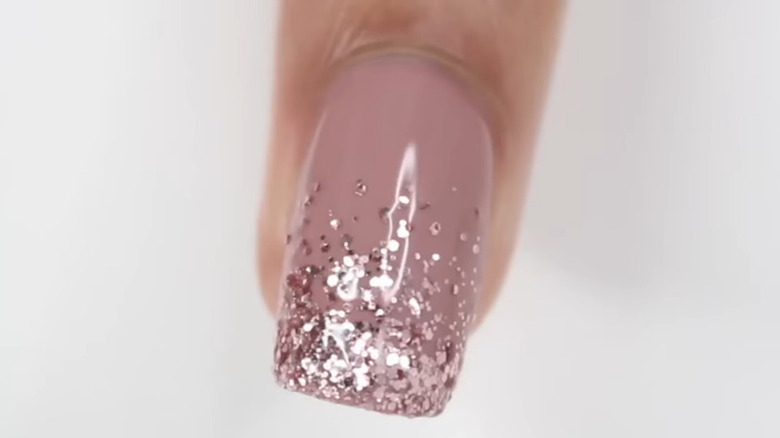
Adding glitter to a solid gold base helps create a monochrome look with texture. You can try this look with any color, just make sure your base and glitter match, or at least coordinate. The glitter is applied in a fade finish — meaning there's more sparkle at one end of the nail that fades into only a few flecks at the opposite end. In a tutorial, nail artist Gabby Angelique shares a quick trick for getting the perfect glitter gradient fade — use a toothpick to place a few individual specks of glitter at the edge.
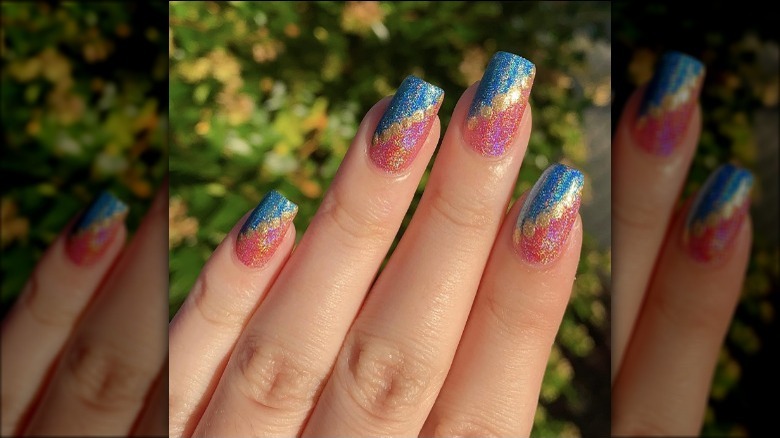
Flaming hot highlights
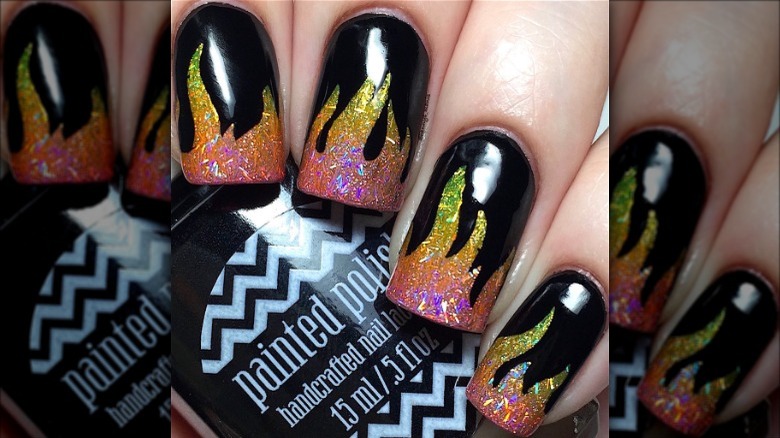
How hot are glitter nails? Flaming hot! Adding a glitter flame to black nails can only result in a steady stream of awesomeness. Actually, the glitter comes first, courtesy of a holographic base. On top of that, color (via liquid Sharpie highlighters) is applied in stripes across a sponge, then dabbed over the glitter to create an ombre effect. A vinyl flame is attached at the top, then a black coat is applied. When almost dry, the vinyl is removed to reveal this wicked-hot effect.
Rose gold for the win
Rose-gold nail polish is pretty. Rose-gold nails plus shimmery rose-gold glitter in all sorts of light and dark shades are even prettier. Yes, it's okay to mix your glitter polishes all in the same manicure. Just start with a gorgeous rose-gold hue and design your nails around it. A plain pale rose polish can be boosted with sparkles on top, while an ombre of various pale pink, dark pink, and rosy gold glitter hues creates a beautiful finish.
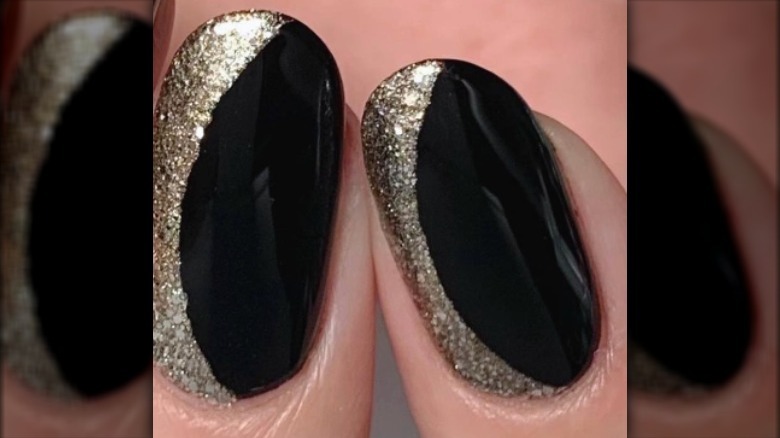
LBD -- the glitter nail way
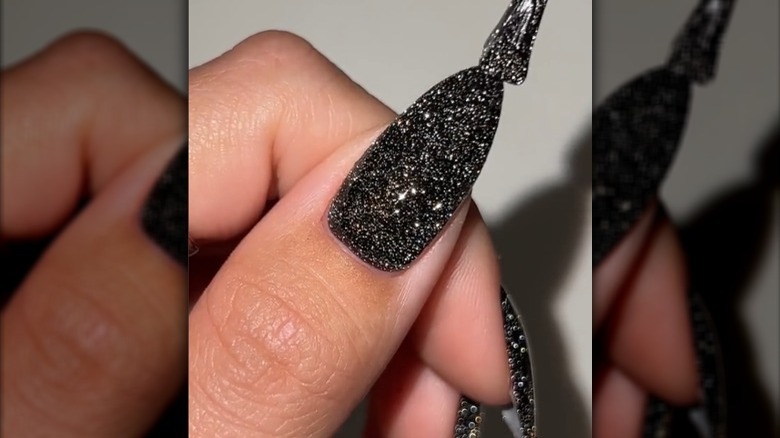
You've got your little black dress all picked out for the night, now you just need the right nail polish to go with it. Why not stick with the color palette á la Wednesday Addams and do a black nail? You'll want to make it glittery, though, since this is an occasion and you did bring out your LBD. There are lots of black polishes with the glitter built right in that you can choose from, but for extra sparkle power, pick one with reflective silver glitter.
Top it off
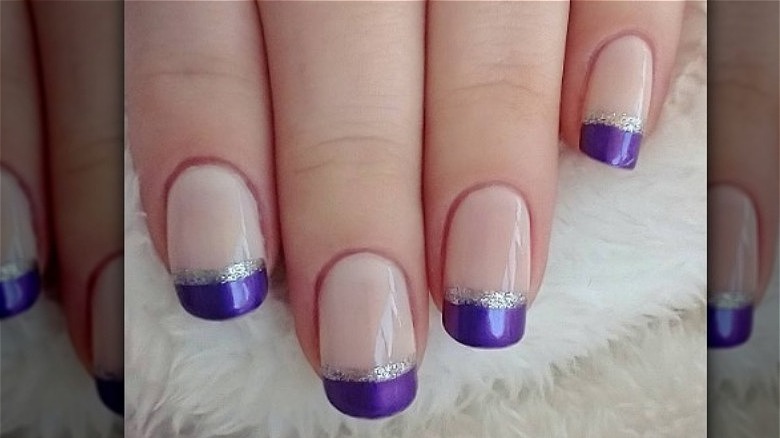
It's on the tops of your fingers, and it's a good place to be. If you like to put twists on tradition, then a completely modern French tip manicure could be your next favorite thing. A neutral base of pale pink or creamy white gets royal purple chrome tips. But why stop there? Use a thin brush to draw a silver glitter stripe just beneath the purple. For a steadier hand, use a bit of nail tape so you don't invade the neutral base.
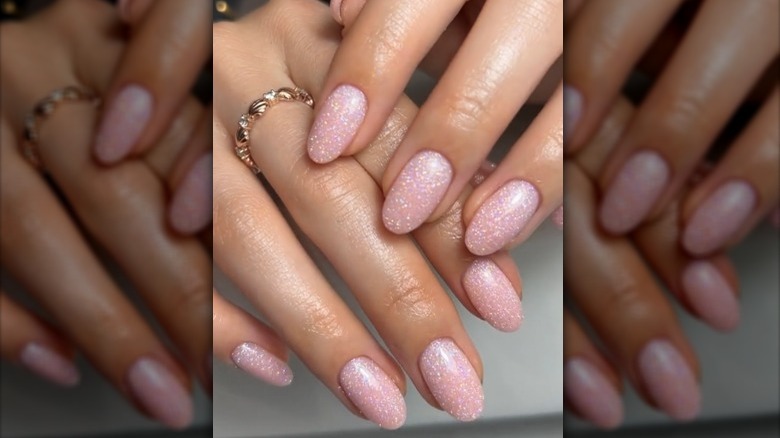
Barely there
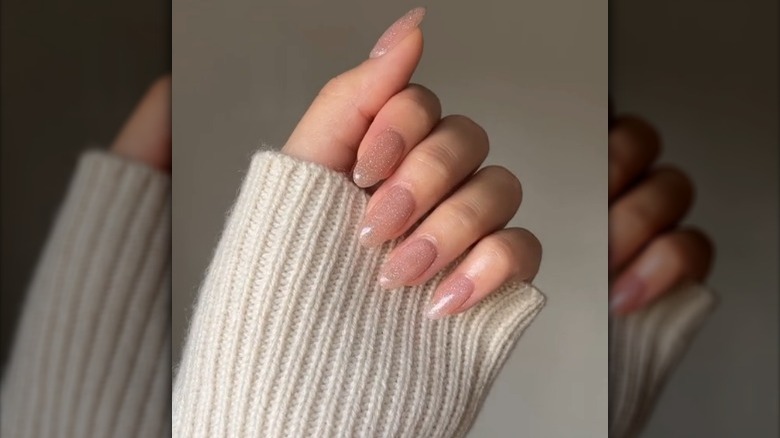
If you love the idea of sparkle, but prefer an understated nail, you can have the best of both worlds. Prime your nails with a base coat, then apply one coat of glitter nail polish, and finish with a clear top coat. The trick is to find a polish with fine particles of glitter in a clear base. You should also look for a bottle where you can see the polish move when you turn it; this means there's a bit less glitter and a bit more polish in the bottle, and the sparkly stuff will go on less concentrated.
Carnival swirls
Looking for a whole lot of fun, such that you would have at a carnival? Try a swirled mix of glitter colors using the water marble technique. Fill a bowl with water and drop circles of polish into it; swirl the colors together with a toothpick to create your desired pattern. Dip your nail into the water, use the toothpick to round up the excess color, then lift your nail out of the water with the marbled polish on top. Repeat for each nail, which will allow you to vary the colors and designs.
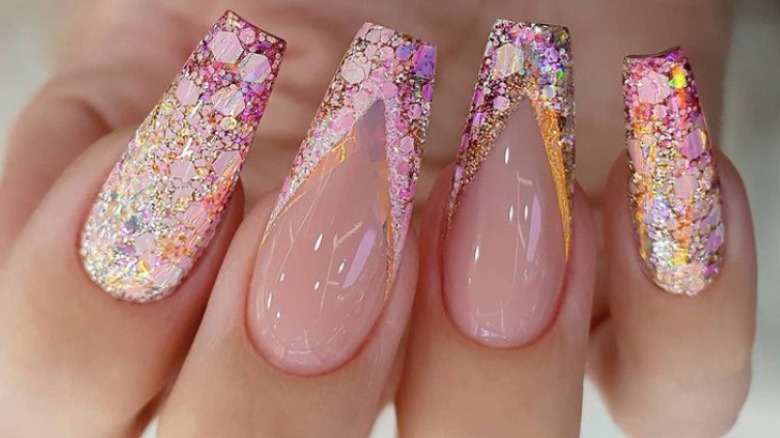
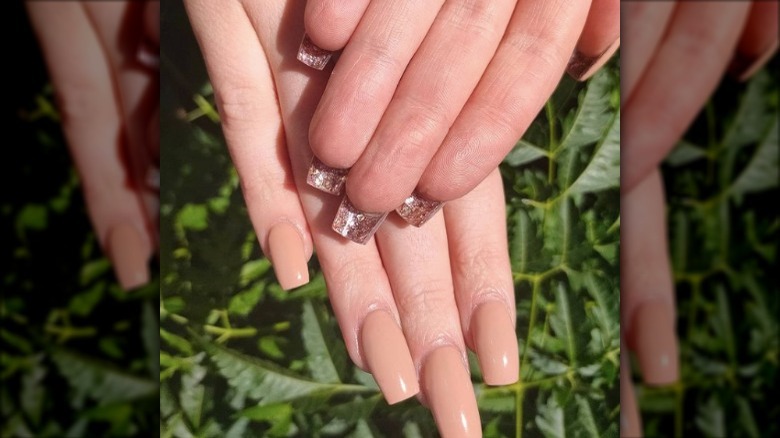
All about that base
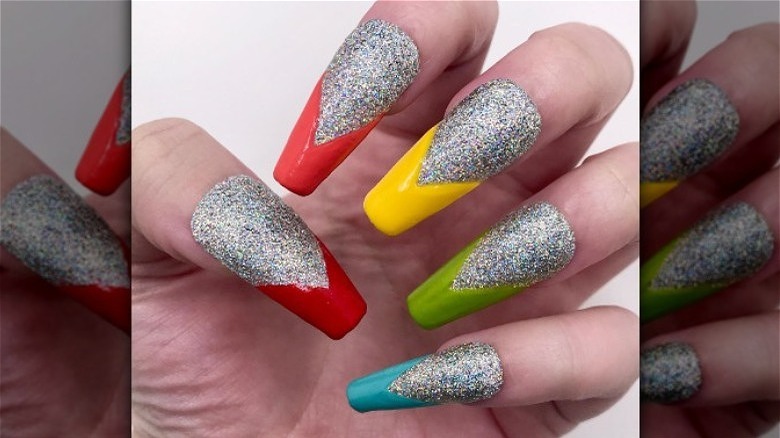
Glitter accents are cool, but sometimes you need more. That's when a glitter base comes in handy. A solid coat of glitter can start out any nail look with the appropriate amount of sparkle. Try a solid holographic glitter in a silver hue and layer it with two to three coats. To cap it off, paint on V-shaped tips in bright, primary colors. If you have shorter nails, you can skip the deep V and just go with a bold curve of color.
Glitter can be matte, too
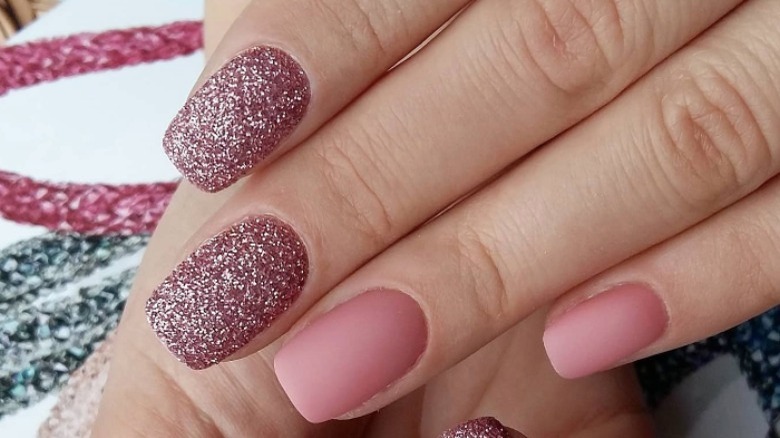
While it's true that glitter was made to sparkle, you can also have fun with it in a less shiny version. Matte nails are a trend that was so popular, they became a part of every nail girl's bag of manicure tricks. While there are polishes with the matte finish built right in, for glitter nails, it's best to use a matte top coat. Paint some nails a solid color, and others with a glitter finish for a mixed manicure. The matte finish lessens the shine of the glitter but doesn't dull it completely.
Spots and sparkles
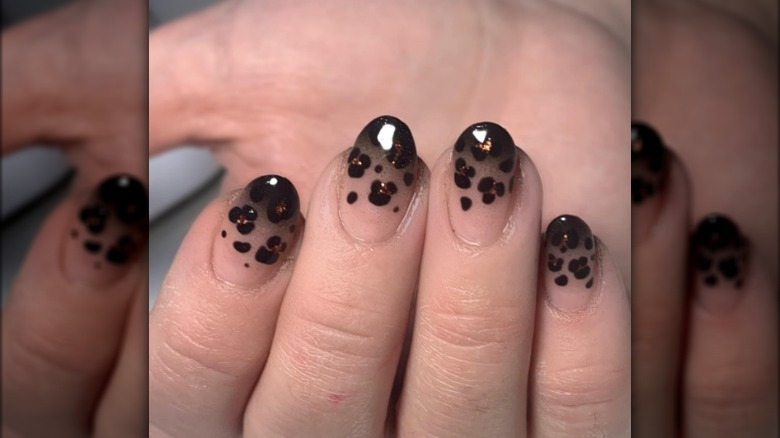
Seeing spots? You could be with this dotted and sparkled finish. For this manicure, an airbrushed black ombre is added to a neutral base, and then animal print dots are painted on. If you want to skip the animal print-inspired dots, but still like the idea of black dots, you can create the look with a dotting tool, or splatter them into place with a brush. You could also use black glitter polish to create an extra gleam. Top off the tips with an ebony hue and seal everything with a super-shiny top coat to pull it all together.
Marvel at the marble
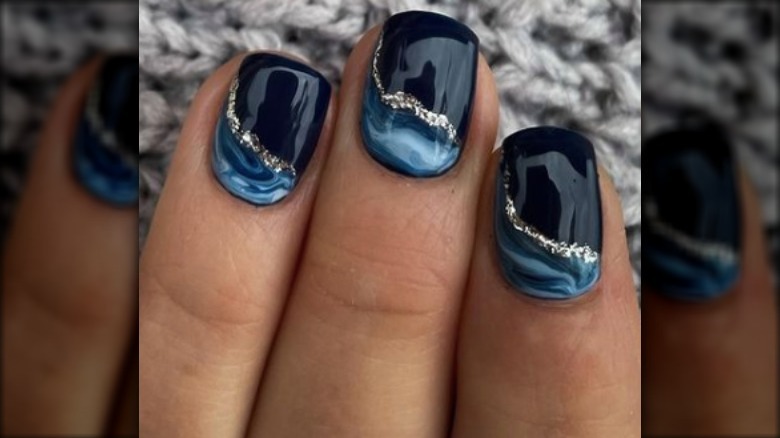
If you like a little art with your glitter, try a marble nail. Start the look with a glossy navy blue base. Paint a stripe of baby blue polish and a stripe of medium-blue polish onto a plastic bag and lightly swirl together; pick up the swirled colors with a brush and lightly dab on to the base of the nail, allowing some of the darker blue to show through and creating a marbled effect. When dry, use a thin brush to paint a line of silver glitter as the marble vein. So artistic!
Clearly awesome
While glitter polish can accompany just about any other nail polish out there, sometimes you just want to let it be spectacular all on its own. Choose a clear polish with silver or multi-color, small or large glitter pieces. You can apply the polish with a brush, or, if you want more evenly distributed glitter, use a makeup sponge. Apply the polish to the sponge, then dab it onto your nail. You'll get more glitter, and less liquid from the polish, giving you more sparkle.
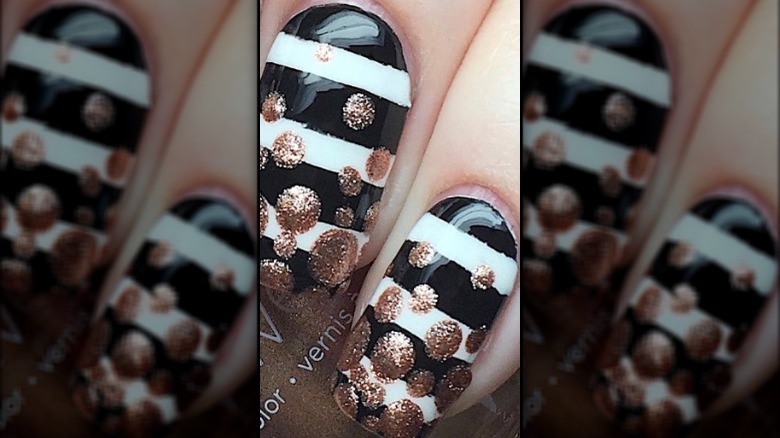
Three stripes and you're in
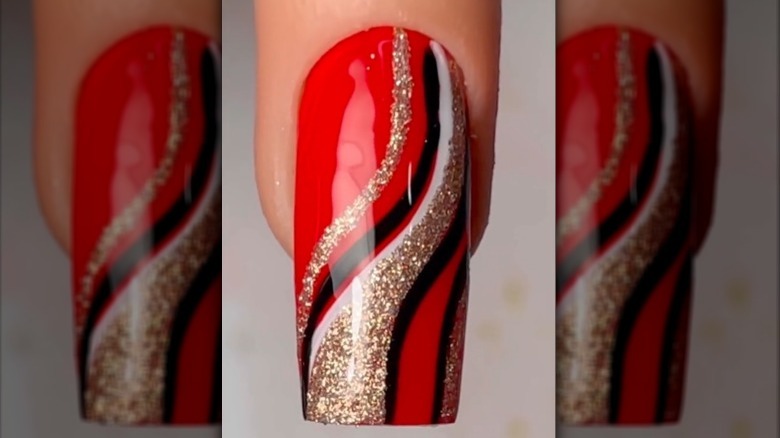
When you realize your bright-red manicure is missing something, that's when the stripes come in. Using a thin nail brush, paint on curvy black and white lines. With gold glitter polish — or a mixture of loose gold glitter and a clear polish — fill in some of the blank areas with solid sparkle, and add in an extra stripe or two. Seal with a shiny top coat, and you've gone from classic red to totally awesome.
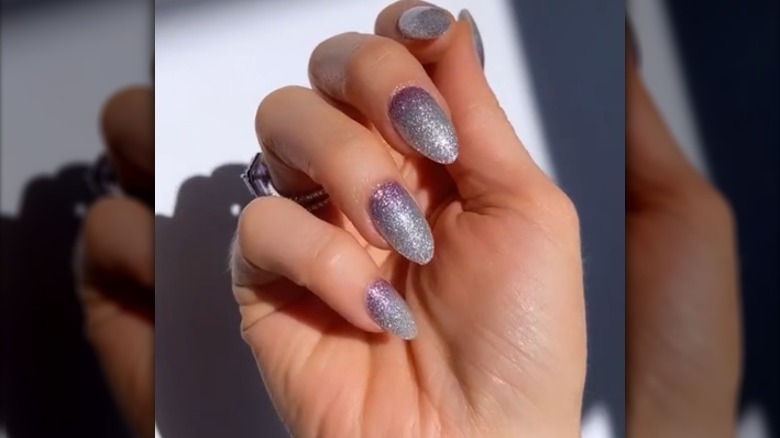
Silver -- so many ways
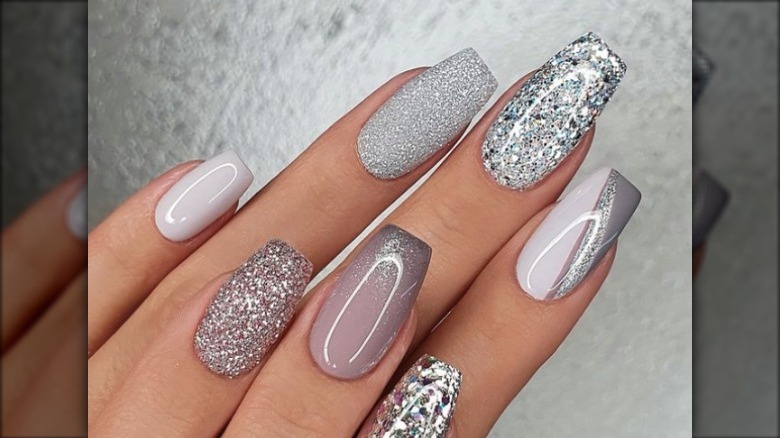
Silver and gray never looked so good. Mixing metallic glitter polishes of the same color, but with different textures, will get you a mani worth all the gold — or in this case, silver. For the non-sparkle, try creamy polishes in various shades of pale, dark gray, and taupe-gray. To go along with those, try chunky silver glitter on a few nails. You'll also want to use a smaller silver glitter for an ombre finish. And then a medium silver glitter with a matte finish. There are so many possibilities to bring this look to life.
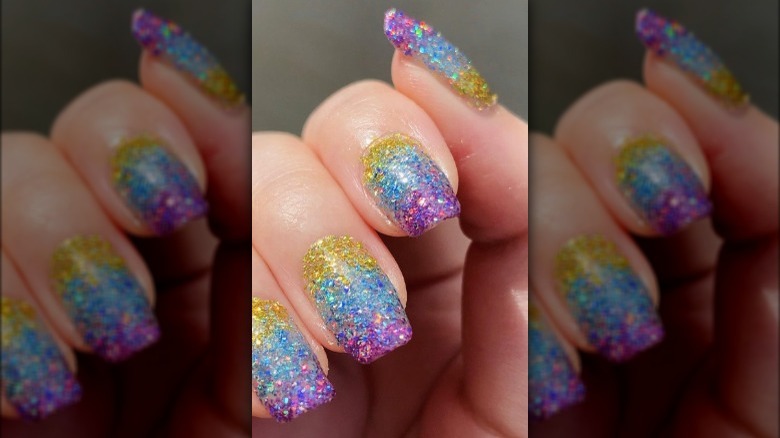
Use all the colors, see all the sparkles
Why choose one or two colors when you can have them all in one pretty and perky manicure? Go ahead and paint each nail a different color, but use the same multi-colored glitter polish to finish them off with even more hues. Try a fade from the tips down for most of your nails, but go for a solid dose of glitter over the whole nail for one special color; white really makes those glitter colors pop.
Angling for more glitter
Half-and-half nails don't always have to be vertical or horizontal — try something on an angle to up your design factor. You can use two shades of glitter polish divided by a line of glitter dots for a super-hero inspired finish. For the Clark Kent version, opt for a clear nail, then brush a glitter polish over one side to create a diagonal split. Don't forget a top coat over any glitter-polish look. Not only will it help the glitter look even shinier, but it will help prevent chips and make your mani last longer.
Glitter marks the spot
Your black-and-white striped manicure has lasted all week, and you hate to give it up so soon. But nail polish is meant to be changed, and a new look is right around the corner, thanks to metallic glitter polish. Add a new dimension to your existing nail design by dropping dots of gold glitter onto the nail. If you have a special nail dotting tool that's handy, but if not, a toothpick or bobby pin will work just as well.
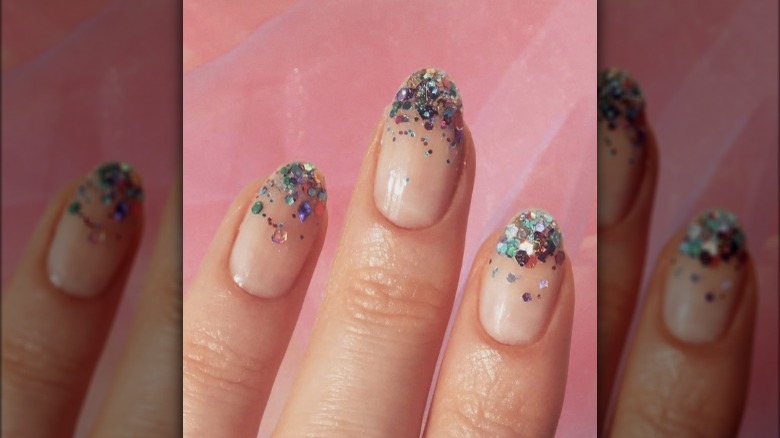
Go big and go all out
You might think of glitter as being tiny flakes of sparkle and shine, but you're going to have to think bigger, because glitter can definitely be bigger. When looking for your next glitter polish, take a closesr look at what's in the bottle; you'll see that some polishes use both larger dots and smaller flecks. You can also create your own by sprinkling big spots of loose glitter over your wet nails. If you have a more precise look in mind, try placing individual glitter pieces with tweezers or a toothpick.
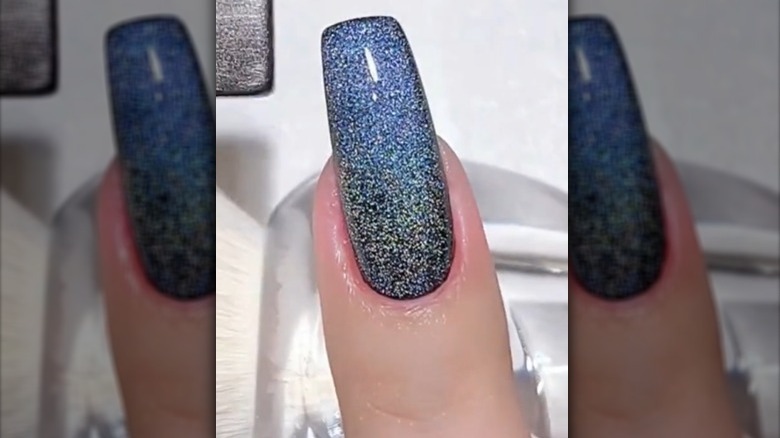
Holla for holographic
If you jumped on board with the holographic highlighter makeup trend, you'll love holographic nails. Although both glitter nail polish and holographic nail polish will leave you with a super-shiny, super-twinkly finish, there is a difference between the two, as F.U.N Lacquer explained. "While glitter reflects light in a single color," they explain, "holographic polish actually bends the light and shows a rainbow of colors." Try a holo nail — as Instagram has dubbed the look — in a gorgeous solid hue.
Loosen up
If you can't find the exact glitter polish you're looking for, you can create your own. Start with a base coat in the color you want. When the second coat is still a little wet, use a fluffy makeup brush to pick up loose glitter and dab it on your nails, coating as much or as little as you want. Allow the polish to dry completely, then brush off excess. A top coat is essential to keep the glitter in place.
All mixed up
Mixing glitter sizes and glitter colors can create a fabulous finish, especially when combined with different nail techniques. Starting with a neutral base, some of the nails (you pick how many) are coated with a solid base of gold glitter polish, with micro flakes of shine. On top of that, a dark pink polish with larger flecks of pink glitter is painted over the top, with more emphasis on the ends. For contrast, center nails are given a glitter V-tip, with a gold glitter polish outline. This technique creates such a pretty mix!
Just a dab will do
Glitter is always a statement, and if you prefer your nails to give a loud whisper instead of a shout, you can add a little less glitter for a still-sparkly impact. Dab a thick layer of silver glitter on the edges of your clear nails for a small but packed area of twinkle. By keeping your nails neutral, it allows for those sparkles to really make your fingers shine, especially if you use a multi-colored silver glitter.
Pop goes the glitter

Proving that just about every hot nail trend looks good with glitter polish, here's the viral pop art nail trend all sparkled up. The base of this comic-book-looking nail is all about ruby glitter. On top, a gray outline serves as the frame, and white polish accents are added to further highlight the pop art look. A matte top coat finishes off the look. While red is always a stand-out color, you could use glitter polish in just about any color to create a pop art nail.
Ombre, the glitter way
Ombre nail looks come in all sorts of color combinations, including glitter versions. Simcha Whitehill, known as Miss Pop in the nail art world, shared a trick for creating a two-toned ombre nail with a glitter finish, like this white and gold perfection. She advises applying the polish at one end, then gently brushing to the center of your nail, letting the glitter fade. You can apply an extra coat or two along the bottom to intensify the sparkle.
Holo curves
One of the great things about holographic glitter (besides the twinkle factor) is that it goes with every color, because it is every color. Just see how fabulously it accompanies a baby blue, baby pink, and white dabbled base with its sparkle power. After the tri-color foundation has dried, use a stencil to paint on curved stripes with holographic glitter polish. If you can't find a double-curve stencil, you may need to paint one stripe at a time.
Drip it like it's hot
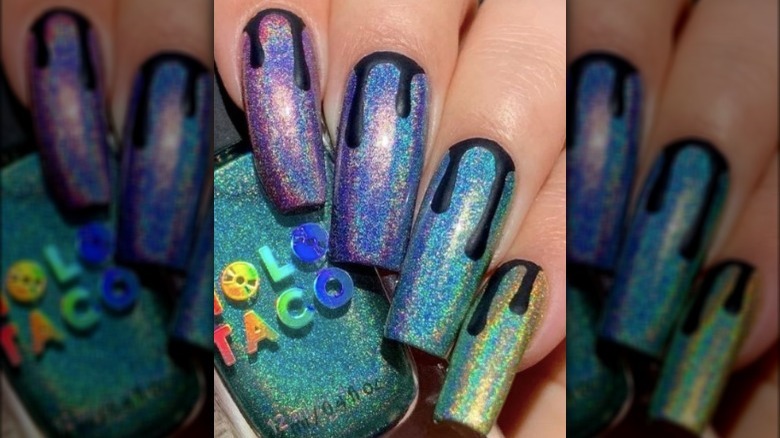
How do you make glitter gradient nails even cooler? Add a matte black polish to create a trendy drip paint finish. Start with the glitter, polishing digits with either a solid hue or mixing it up with various blended shades. Next, grab a matte black nail polish. Apply a line of black along the curve of your bottom cuticle. To make each drip, use a nail dotting tool to apply a dot of black halfway up the nail, then use the tool to draw the polish down to the cuticle.
Magic magnetic glitter
Glitter is ever-evolving, and there are new techniques arriving on the scene all the time. One great invention: magnetic glitter polishes. After painting on a base coat, the magnetic glitter is applied over the top. While still wet, a magnet is held over the polish, attracting the glitter. By placing the magnet in a variety of positions, you can customize the glitter placement, creating angles, lines, and cat-eyes. Yes, it truly is that amazing. Let's hear it for glitter inventions!
Glitter on the side
Want another way to change up your existing manicure for week two? Glitter polish is on the job. A solid-color nail base can get a new design lease with a stripe of gold. Use glitter to paint a thick curve along one side of the nail, serving as a partial outline of sorts. You can also push that line out a bit further to cover more of the nail for a half-and-half finish. A stencil can help you keep either line steady and clean.
Try tri-color ombre
Ombre nails feature colors that blend into each other at the seams for a solid looking finish — but with multiple colors. And, of course, you can do this with glitter nail polish. To create the look, a makeup sponge is incredibly helpful. Apply stripes of each color to the sponge, right in a row; be generous with the polish. Dab the sponge on to your nails, repositioning slightly with each dab so the colors blend a little. Bonus: The sponge soaks up some of the liquid, leaving you with more glitter power.
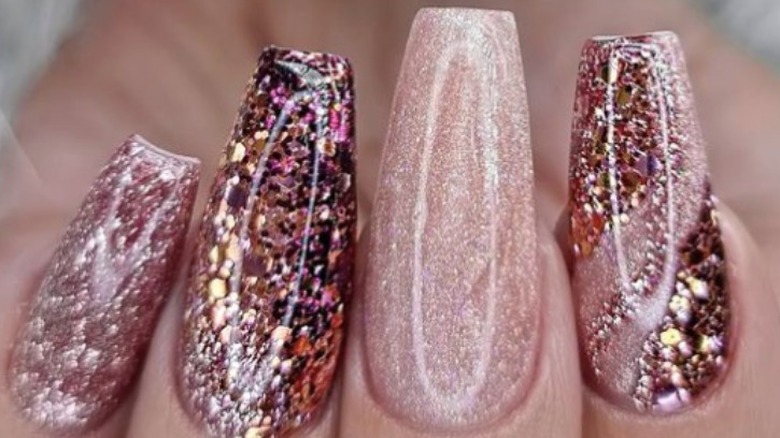
Au naturel glitter

Not natural nails, but rather, nails inspired by nature. A basic, neutral taupe nail gets a boost of awesome with the addition of two glitter-leaf trees. Draw a few simple black lines, then dab gold glitter around them for the foliage. Hint: If you use a polish with both smaller and larger gold flecks, you'll get more leaf sizes. Not every nail needs to have a tree; if you leave a few without nature, your gold leaves will stand out even more.
The shape of glitter
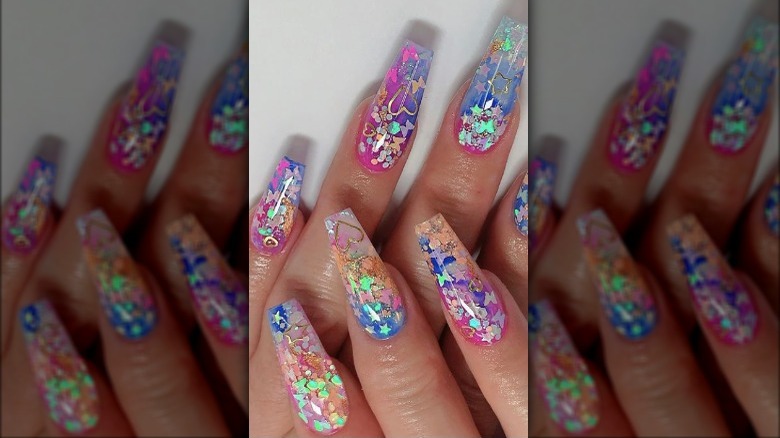
When your ombre nails scream for butterflies, stars, and hearts over your tiny glitter coat, you only have to find the right shape glitter and add it on. Glitter comes in all sorts of shapes, and you can use them all at the same time if you want. You can also pick and choose just a few, and use a heart as an accent for Valentine's Day, or a butterfly on the first day of spring. If you don't want full coverage and are picky about your glitter position, you can use tweezers for precision placement.
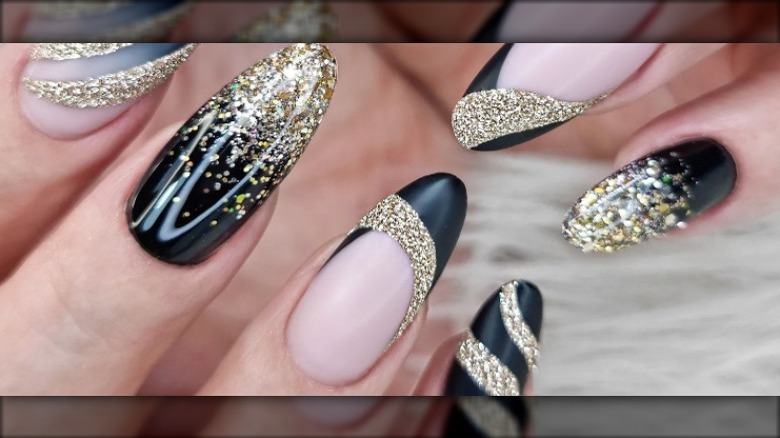
A luxe tux take
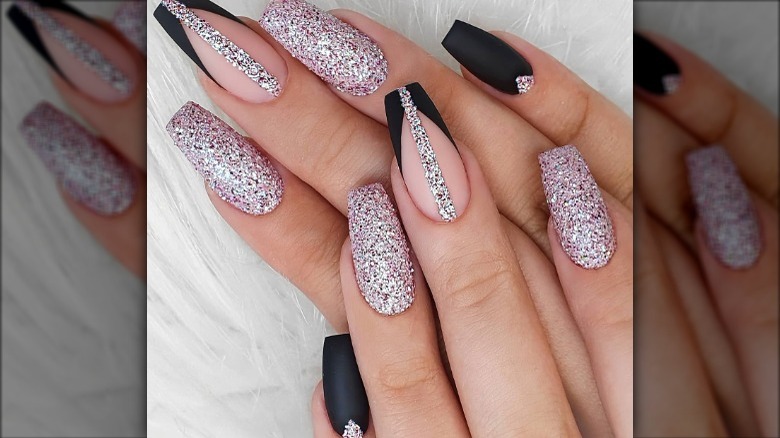
Tuxedo nails are traditionally done in black and white polish, mimicking the colors of James Bond's trademark suit. This take swaps out the white for glitter but still keeps the vibe strictly ballroom. Two nails are done in solid glitter, and two in solid matte black with a dot of glitter at the base. For the tuxedo shirt, the center nail is given a collar with a curved tip of black polish, while a row of buttons is created with a stripe of glitter.
That's a wrap
Glitter nails are gorgeous, and painting your nails can be just the self-care break you need, but sometimes you just want the pretty without the extra effort. Nail wraps, or nail stickers, are the perfect alternative — and you can get them in glitter! Simply peel off the wrap and apply it to your nail; use your fingers to smooth it in place around the sides of your nail bed. Fold over the extra wrap at the top of the nail and gently file off the excess.
Flutter by butterflies

Love the magic of butterflies? Have a beautiful monarch (or five) land on your nails, complete with glittery wings. Choose an orange-gold glitter polish and paint the entire nail; let dry. Use black polish to create the wing frames and let that dry, too, before dotting on white spots. If you're looking to try more delicate nail art, pick up a few thin brushes for your manicure bag to use in place of the provided nail polish brushes.
Why choose just one?
Can't decide if you want to do an all-glitter nail, or just maybe a few glitter accents? You don't have to choose with a multi-manicure, with each nail on your hand featuring a different design doused in sparkle. The key is to pick a color palette and stick with it. Black and pale-pink polish start out this scenario, and gold glitter is used to create the shiny accents. Ombre the black and pink and add gold glitter stripes, fade the glitter over solid black, do just the tips, or go for a solid glitter nail.
A touch of gold

Gold glitter is a classic, and can be worn all by itself. But when you combine gold glitter nail polish with other hues and designs, it brings a little extra something special to your manicure. Tortoise-shell nails are pretty as is, but get a 14K upgrade with a few stripes of gold glitter polish. Don't worry about every nail looking the same; you can mix and match the gold stripes however you want. Just keep the stripes thin so you don't cover up the beautiful base.
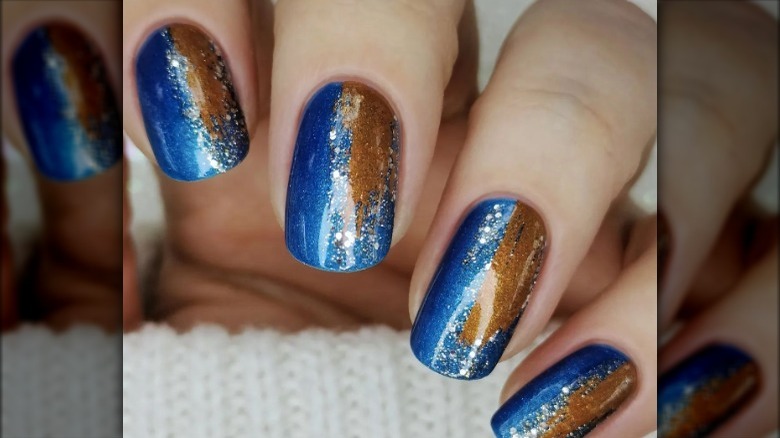
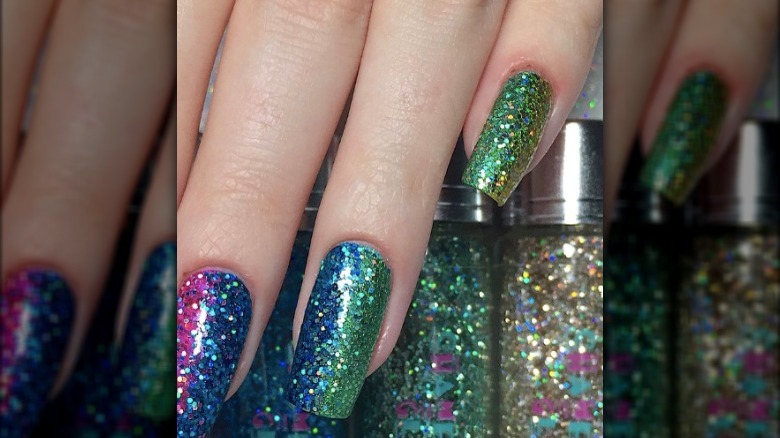
Feeling blue
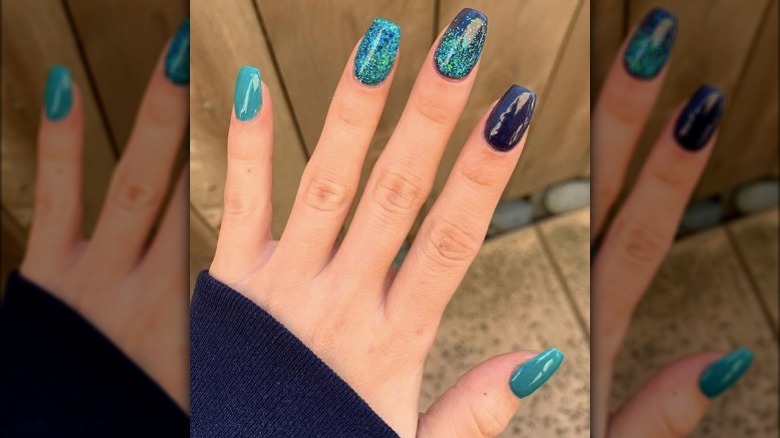
Oh, the things you can do with blue, teal, and glitter! Keep your mixed mani all in the same family by painting three nails with a solid teal polish, and two with navy blue. Pick out a glitter polish that has both teal and dark blue glitter flecks; if you can't find one, try layering on two different polishes. On one dark nail, start the glitter at the bottom and let it fade at the top. On one teal nail, do a solid coat of glitter. Blue never looked so happy.
Stripes and solids
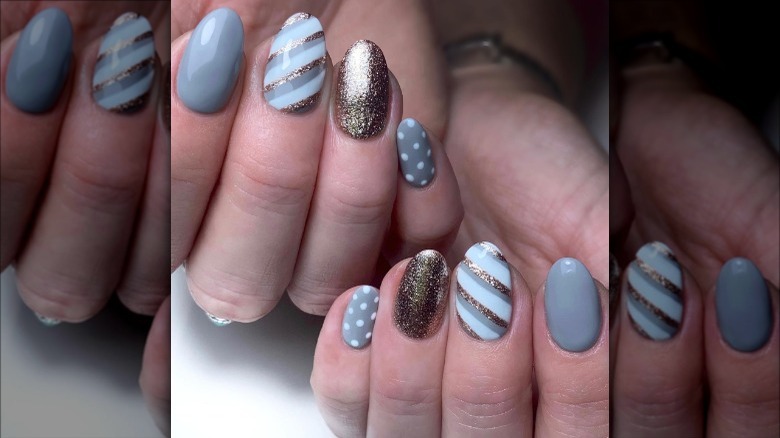
You can bring any manicure into next-level territory with the addition of even just a little bit of glitter. For instance, take a gray and white mani technicolor with a gold metallic edge. Shiny glitter polish with micro-fine gold flakes looks fabulous all on its own next to white polka-dots. You can add an extra dimension to those gray stripes by brushing matching gold ones next to them. Remember, anywhere you can paint regular polish, you can paint glitter polish.
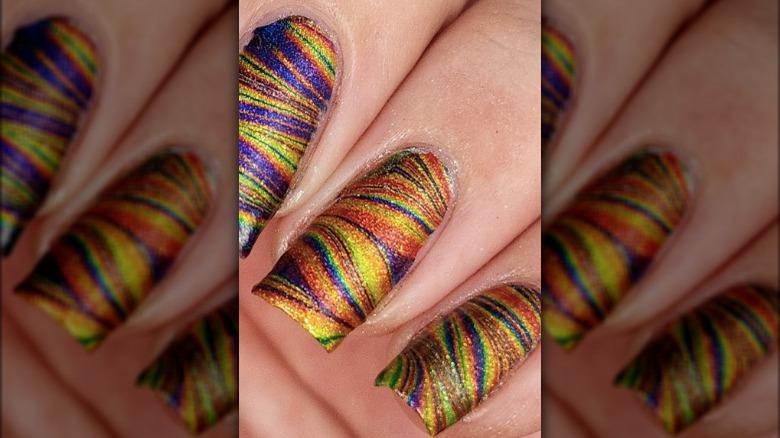
Squiggled, swirled, sparkled, and Skittled
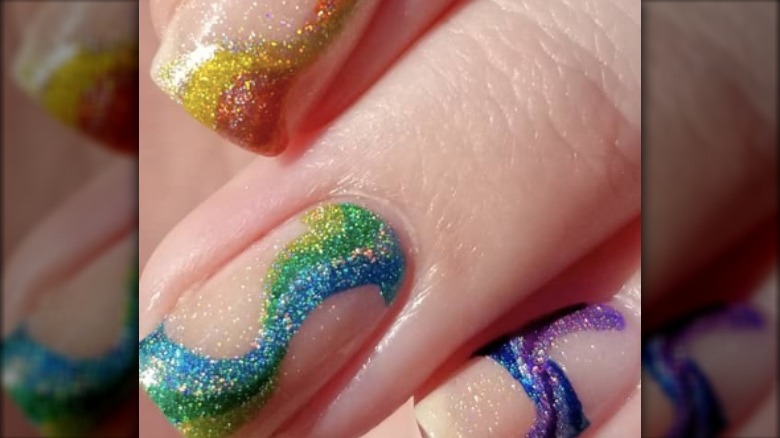
If you don't already own a nail dotting tool, this may convince you to get one. These swirly squiggles were created by applying curved stripes of holographic glitter polish onto the nail using a dotter. First, though, a natural nail was brushed over with just the tiniest hint of silver glitter polish. Each nail includes three coordinating colors, applied so the stripes look like they're twining with each other. The rainbow of colors gives new meaning to a Skittle manicure.
This nail is on fire
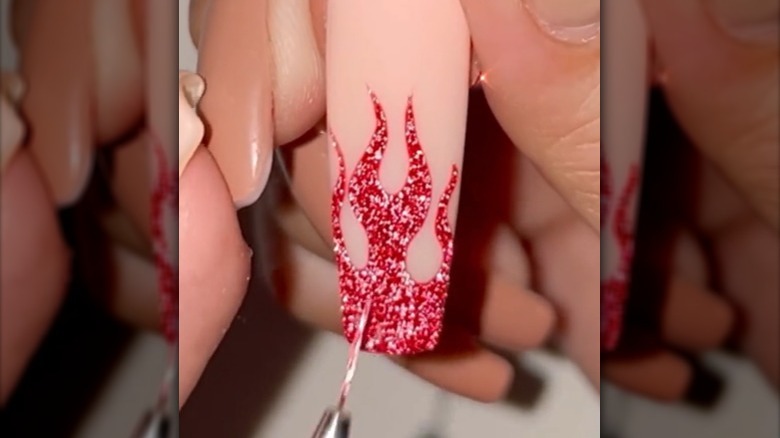
What's hotter than a perfectly done pale nail? One with a glittery red flame. If you have a steady hand and a desire to set the world on fire with the perfect manicure, you've got this. Grab a thin brush and your glitteriest red polish, then paint on curves that connect, working from the center of the nail outward. Fill in the curves and you're cooking with fire! You can repeat the flames on all ten of your fingers, or just choose one or two to ignite.
Subtle star of the show
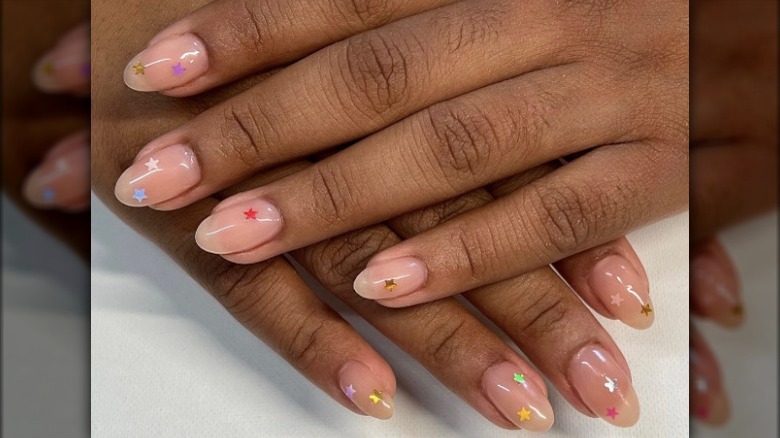
Baby, you're a star, and you should have nails that show your status to the whole world. To incorporate a sparkly star, or a few, in your glitter manicure, you can find nail polishes with shaped glitter already included in the mix. You can also add extra ones. If you don't want to go overboard with the glittered stars, a pale-pink nail with a couple of colorful subtle sparkly stars carefully placed here and there is another great option.
The layered look
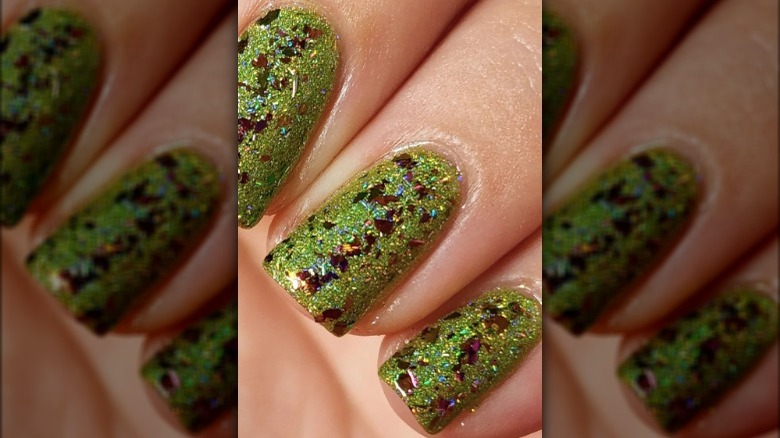
The beautiful thing about glitter polishes is that most of them are a bit on the thin side. And that means you can layer them without building up your nail to inconceivable heights. If you've already added red flakes of glitter to your lime green glitter nails, for instance, then decide the whole look needs even more sparkle, you can add another layer of confetti glitter over the top. When combining multiple glitter polishes, you only have to do one coat of each to get a little extra twinkle.
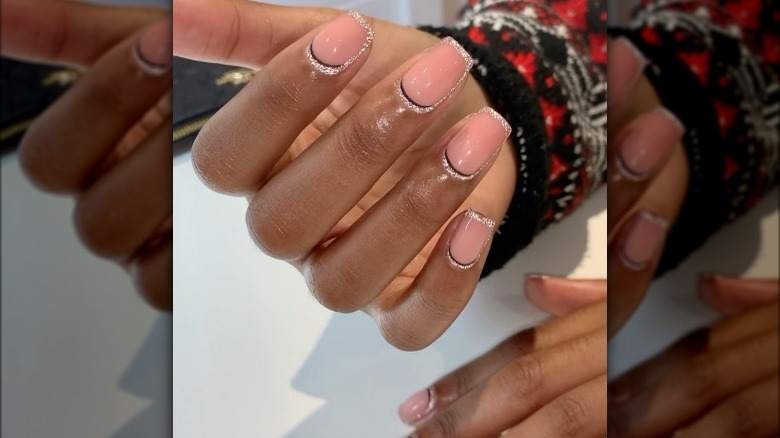
A touch of silver
If the end of your dream rainbow has a pot of silver instead of gold, you're in luck, because silver glitter polish is the perfect accent for just about any nail look. Give your vanilla-white manicure extra credit with silver glitter plus signs painted over the top of one or two nail beds. An extra stripe of pure-white polish draws even more attention to the silver accents, and if added before the silver, can serve as a helpful guide for the plus placement.
Glitter at night
What's prettier than a dark blue sky with a golden moon? One that also includes the stars. Feel free to go totally art museum on your nails, and do a modern take on the famous painting "Starry Night." Start out with a shiny blue base and let it dry. Paint on the stars with silver glitter, covering one half of the nail. The "moon" is a swash of bronzy-gold polish mingled with the stars. You're feeling very Van Gogh right now, aren't you?
Velvety and glittery and pretty

If pure luxury is the story you want your fingers to tell, then velvet nails are the way to go. There are several ways to create the trend, but the most popular is via magnetic nail polish. A magnetic wand held over a special nail polish grabs the sparkle and manipulates it so the result looks like velvet fabric. You can also use a holographic or micro-glitter polish to create the same look sans wand.
Multi mani
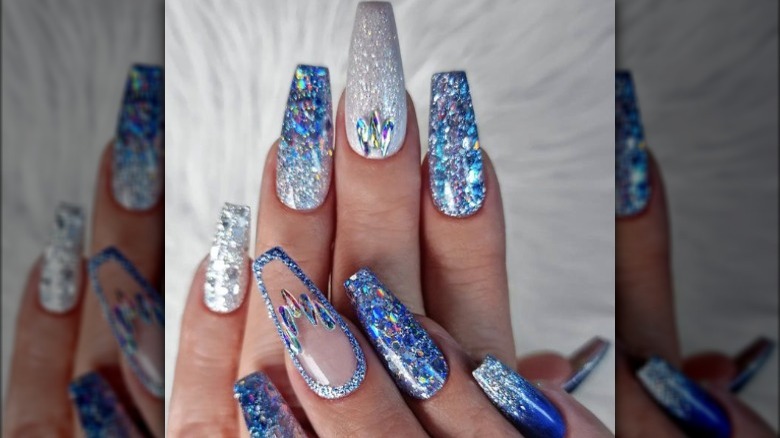
A multi mani has multiple nail designs, all on one hand. Your color palette is the only consistent thing, with permission granted to get creative in every other way. Blue and silver are the theme here, using both solid colors and glitter polishes. Larger holographic flakes coat one nail, while plain silver is the base of another. Blue glitter performs an ombre with silver glitter, while silver tops a solid blue. Everywhere you look, there's something twinkly and shiny to admire.
Surrounded by glitter
Hands up — you're surrounded by glitter. And really, you want to lift your digits up so everyone can admire the glitter outline you have going on. If you've got a steady hand, a thin nail brush can help you create a line of glitter polish that surrounds your entire nail bed. If you need a little help, you can use a vinyl nail cover or sticker to cover the center of your nail bed, then just polish around it.
French tip and fade and glitter
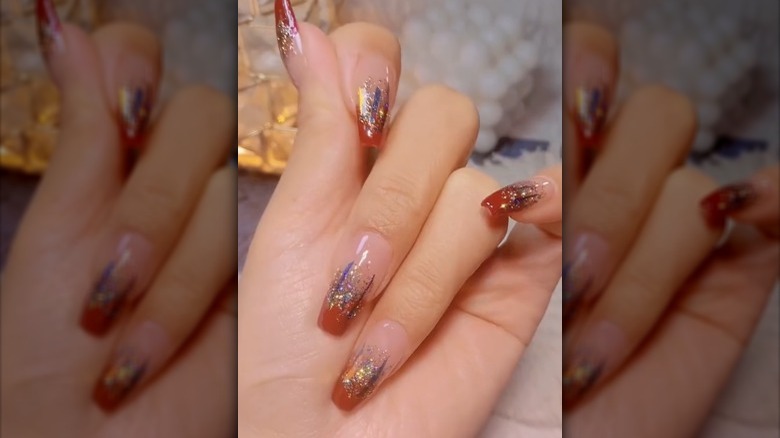
It's a why-choose situation, and you don't have to. You can do a French manicure with maroon tips. And you can add a fade right in the middle of the nail. And you can do it with glitter. Win, win, win. Start with the red edge and let dry. Use a wispy paintbrush to dab on glitter polish at the edge of the red, then lightly drag it downward. You might want to use a plastic plate or plastic bag instead of your hand for the polish palette. Finish with a top coat.
Underneath it all
The mullet of nails! Business in the front, party in the back — or underneath, as it is. For a sparkling twist on classically clear, pale-pink nails, a coat of rose-gold glitter polish shines from underneath. As suspected, you'll need to have longer nails to achieve this look, since you need space on the underside to apply the polish. You may also find it easier to use a smaller brush or even a damp cotton swab to dab on the glitter.
Gradient and radiant
Gradient glitter nails are both colorful and sparkly, a combination that's hard to beat. Individually, nails are pretty to look at, but when all five fingers are viewed together, it's a spectacular finish. Starting with nail one, half of the nail is painted one color, the other half a different color, with the two lightly blended in the middle. The next nail picks up with the same color, then introduces a new one. For a rainbow effect — yellow goes to green, green goes to blue, blue goes to pink, and pink goes to red. It's an across-the-hand gradient. And oh-so glitterful!